Batch File Renamer Chrome App
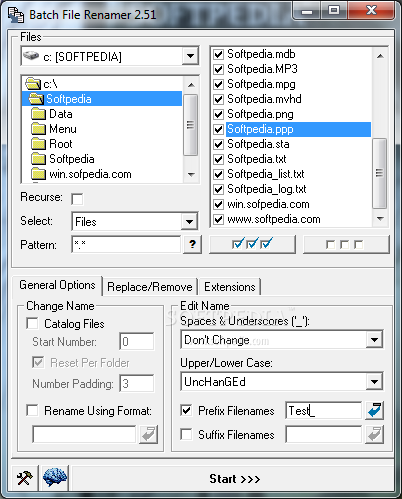
One of my main use cases for my ‘living room laptop’, now a Chromebook, is to manage photos taken on my digital camera (or phone). When my laptop was a Windows machine, I had a batch file renamer application. I cannot find one for ChromeOS (and have not enabled devoper mode on my Chromebook to access its Linux tools).
So I am going to make a Chrome App to do this. Specifically, I want it to work on my local (“Downloads”) directory. I also will develop this app on my Chromebook! This will be my first Chrome App.
Click here to download the completed source code
|
Contents |
Required Apps
Hello World App
The first thing I did was follow the steps on Google’s First App page.
This shows you that each app has 4 required files:
manifest.json- background.js (manages app lifetime)
- window.html (required if you want a UI)
- icon file(s)
It is unclear how CSS comes into play, but the JavaScript file is included in
the manifest, not the html file. After looking at other examples, it appears
you can include ‘normal’ CSS and JavaScript files from the .html file.
Batch File Renamer App Structure
I then copied the source of the “Hello World” app to my own app and updated the
manifest to describe a batch file renamer. I also renamed the html file to
index.html.
As this is my first Chrome App, I am also reviewing the other Basics and some Sample Apps
I ended up with the following files (many of which are empty ATM):
background.jsChrome App lifetime managerbatchFileRenamer.cssStyle for our HTMLbatchFileRenamer.jsApp logic, included from the HTML (the “model”)bfr-16.png16x16 iconbfr-128.png128x128 iconindex.htmlMain UI (the “view”)LICENSE.txtMIT licensemanifest.jsontells Chrome what the app isreadme.mdExplanation of the app
I plan to need the following ‘parts’ of the app:
- File list, with checkboxes and origional names
- Open button (and
Ctrl + o) - Drag and drop support
- Open button (and
- File list with modified names
- Possibly as a dialog on ‘ok’ or ‘confirm’
- Options
- File extention filter
- List of rules (and checkboxes)
- Add/remove rule buttons
- New rule options
- Find string
- Replace string
- Is regex checkbox
- Case conversions (perhaps in version 2)
- Extention specific
- Filename specific
- Prefix and suffix entries (and checkboxes)
- Commit these options to sync storage
- Ok or Commit button
- Somehow confirm
- Style and Icon
File List Part
The first task is to load file names in. For the initial revision, we’ll just open whole directories. The filesystem-access sample app has much of what we need.
I’ll add a minimum Chrome version (versoin 31 was the first to support
‘open direcotry’) and fileSystem permissions to the manifest:
"minimum_chrome_version": "31",
"permissions": [
    {"fileSystem": ["write", "retainEntries", "directory"]},
    "storage"
]
We’ll add a button, path name box and a place to list our files in our HTML:
<div id="main">
    <div id="fileSelectDiv">
        <nav>
            <button id="chooseDirectoryButton">Choose Directory</button>
        </nav>
        Path: <input type="text" id="filePathInput" readonly />
    </div>
    <div>File List Here</div>
</div> <!-- main -->
After including batchFileRenamer.js at the end of the HTML file, we must
connect the open button to a directory open (system) dialog:
<script src="batchFileRenamer.js"></script>
The following code will open a directory prompt and confirm the selection via the ‘path’ input field (that is read-only):
"use strict";

var chooseDirectoryButton = document.querySelector('#chooseDirectoryButton');
var filePathInput = document.querySelector('#filePathInput');

// private -----------------------------------------------------------------
function loadDirectory(entry) {
    if (!entry.isDirectory) {
        return;
    }

    filePathInput.value = entry.fullPath;

    // next we will make a list with each file
}

chooseDirectoryButton.addEventListener('click', function(e)
{
    chrome.fileSystem.chooseEntry({type: 'openDirectory'}, function(entry) {
        if (chrome.runtime.lastError) {
            console.log(chrome.runtime.lastError.message);
            return;
        }

        if (!entry) {
            return;
        }

        // use local storage to retain access to this file
        chrome.storage.local.set({'directory':
                                  chrome.fileSystem.retainEntry(entry)});
        loadDirectory(entry);
    })
});
Next, we need a list of file names an whether they are enabled or not. We’ll need a place to store them:
// State
var m_directoryPath = "";
var m_fileInfos = [];
loadDirectory now will iterate over all of the directory’s entries
and store them in m_fileInfos.
// private -----------------------------------------------------------------
function isFileTypeEnabled(fileName) {
    // TODO: check file type filter
    return true;
}

// private -----------------------------------------------------------------
function createFileInfo(fileEntry) {
    return {'fileEntry': fileEntry,
            'fileName': fileEntry.name,
            'fullPath': fileEntry.fullPath,
            'enabled': isFileTypeEnabled(fileEntry.name)};
}

// private -----------------------------------------------------------------
function loadDirectory(directoryEntry) {
    var directoryReader;

    if (!directoryEntry.isDirectory) {
        return;
    }

    filePathInput.value = directoryEntry.fullPath;

    m_fileInfos = [];
    directoryReader = directoryEntry.createReader();
    var readEntries = function() {
        directoryReader.readEntries(function(results){
            if (!results.length) {
                updateFileEntriesWidget();
                return;
            }

            results.forEach(function(fileEntry)
            {
                m_fileInfos.push(createFileInfo(fileEntry));
            });
            readEntries();
        },
        function (error) { console.error(error);}
        );
    };
    readEntries();
}
Once the list of entries has been updated, we must refresh the UI.
Each file will have its own div with a checkbox and label.
// private -----------------------------------------------------------------
function createFileEntryDiv(fileInfo) {
    var checkbox;
    var fileNameLabel;
    var div;

    div = document.createElement('div');
    div.id = fileInfo.fileName + '.div';
    div.className = 'fileEntry';

    checkbox = document.createElement('input');
    checkbox.type = 'checkbox';
    checkbox.id = fileInfo.fileName + '.checkbox';
    checkbox.checked = fileInfo.enabled;
    // no on click listener needed (yet?)
    fileNameLabel = document.createElement('label');
    fileNameLabel.htmlFor = checkbox.id;
    fileNameLabel.appendChild(document.createTextNode(fileInfo.fileName));

    div.appendChild(checkbox);
    div.appendChild(fileNameLabel);
    return div;
}

// private -----------------------------------------------------------------
function updateFileEntriesWidget() {
    fileListDiv.innerHTML = '';

    m_fileInfos.forEach(function(fileInfo)
    {
        var div = createFileEntryDiv(fileInfo);
        fileListDiv.appendChild(div);
    });
}
Now we have a list of all of our file information both internally
(m_fileInfos) and visually as seen below.
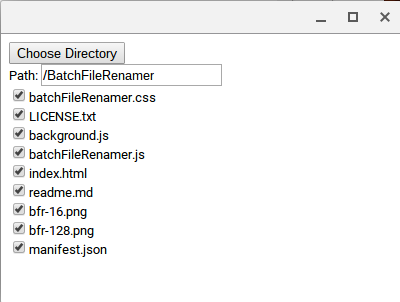
I did find that the app would not automatically scroll on overflow and the folloing CSS was required:
html {
    overflow-y: scroll;
}
First Setting: Extention Filter
Now that we have a list of file (names), we will apply an extention filter. In doing so, we will set up our app’s first settings, which we want to persist across sessions.
To make it clear where all of the settings are, we’ll put them in a group box,
or in HTML, a FieldSet. We’ll put the files in a group box too.
A simple label and line edit (text input) is placed inside the box.
<legend>Options</legend>
    <p id="optionsLoadingP"><em>Loading</em></p>
    <div id="optionsDiv">
        Extension filter:
        <input type="text" name="extFilter" id="extFilter" />
    </div>
</fieldset>
To make storing sessions easy, we’ll create an object to do that.
It will go in its own file: settings.js.
Make sure to include it via index.html before batchFileRanamer.js.
Calling settings() will return an object whose properties will be
passthroughs to
Chrome’s sync storage.
This will be done via
getters
and
setters.
function settings(onLoad)
{
    var self = {};
    var supported = [
        "extFilter"
        ];
    var cache = {};
settings creates an object that caches all settings data as the storage
interface is asynchronous; this is what cache stores.
onLoad is called when cache is initialized.
supported will hold the list of setting we want to store.
    function addSetting (settingName) {
        Object.defineProperty(self, settingName, {
            get: function () {
                return cache[settingName];
            },
            set: function (value) {
                var toStore = {};
                toStore[settingName] = value;
                cache[settingName] = value;
                chrome.storage.sync.set(toStore, function () {
                    if (chrome.runtime.error) {
                        console.log(chrome.runtime.error);
                    } else {
                        console.log("Saved {" + settingName + ": " +
                                    value + "}");
                    }
                });
            },
            enumerable: true,
            configurable: true
        });
    }
For each setting, we will need to create a property with a getter and setter.
The getter simply retrieves data from cache.
The setter will store data both in cache and forward to the sync storage.
Console log events have been added for debugging.
    function initializeCache(items) {
        cache = items;

        console.log(cache);

        if (onLoad) {
            onLoad();
        }
    }

    chrome.storage.sync.get(supported, initializeCache);
    supported.forEach(addSetting);
    return self;
};
Before returning self, we need to request our data from sync storage.
initializeCache will handle caching the retrieved data.
batchFileNamer.js will instantiate a settings object for the lifetime
of the application.
var m_settings;

// ...

m_settings = settings(populateOptions);
populateOptions will be called when m_settings has been initialized.
function populateOptions() {
    var loadingP = document.querySelector('#optionsLoadingP');

    if (chrome.runtime.lastError) {
        loadingP.innerHTML = chrome.runtime.lastError.message;
        return;
    }

    extFilterTextInput.value = m_settings.extFilter || "*.*";
    setExtensionFilter(extFilterTextInput.value);

    setWidgetListeners();
    loadingP.parentElement.removeChild(loadingP);
}
When populating the options, we will check for errors and if none are found,
it will populate all widgets (just the one for now).
If a value is not specified (like first time use), a default one is provided.
After everything is populated, the ‘loading’ paragraph (p) is removed.
We also must watch for change events on each option.
function setWidgetListeners() {
    extFilterTextInput.onchange = function () {
        m_settings.extFilter = extFilterTextInput.value;
        // TODO: reflect filter in file list
    };
}
Due to the setup work before, updating the setting is a simple assignment.
Second Setting: Prefix and Postfix
I also want to be able to (optionally) prefix and post fix file names.
The first thing is to add line edits (and labels) to the html file:
<div id="optionsDiv">
    <div class="optionLine">
        Extension filter:
        <input type="text" name="extFilter" id="extFilter" />
    </div>
    <div class="optionLine">
        Prefix:
        <input type="text" name="prefix" id="prefix" />
    </div>
    <div class="optionLine">
        Postfix:
        <input type="text" name="postfix" id="postfix" />
    </div>
</div>
and then to the settings supported list:
var supported = [
    "extFilter",
    "prefix",
    "postfix"
    ];
and finally to populate and store:
var prefixTextInput = document.querySelector('#prefix');
var postfixTextInput = document.querySelector('#postfix');

...

function setWidgetListeners() {
    ...

    prefixTextInput.onchange = function () {
        m_settings.prefix = prefixTextInput.value;
    };

    postfixTextInput.onchange = function () {
        m_settings.postfix = postfixTextInput.value;
    };
}

...

function populateOptions() {
    ...

    prefixTextInput.value = m_settings.prefix || "";
    postfixTextInput.value = m_settings.postfix || "";

    ...
}
Third Setting: Find and Replace
Now for the most important piece of functionality: find and replace. To start out, well just have a single find and replace pair.
Again, we need UI elements:
<div class="optionLine">
    Find:
    <input type="text" name="find" id="find" />
</div>
<div class="optionLine">
    Replace:
    <input type="text" name="replace" id="replace" />
</div>
For the setting, in anticipation of multiple find/replace pairs, we’ll store a single JSON string:
var supported = [
    "extFilter",
    "prefix",
    "postfix",
    "findReplace"
    ];
We’ll get handles to our UI elements:
var findTextInput = document.querySelector('#find');
var replaceTextInput = document.querySelector('#replace');
and store our settings on change:
findTextInput.onchange = storeFindReplace();
replaceTextInput.onchange = storeFindReplace();
and finally populate our elements:
populateFindAndReplace();
storeFindReplace and populateFindAndReplace translate between the JSON
string and the UI elements. An example JSON string:
[{
    "find": "DCS",
    "replace": "October_"
}, {
    "find": "004",
    "replace": ""
}]
to be stored into:
var m_findAndReplaces = [];
like this:
// private -----------------------------------------------------------------
function storeFindReplace() {
    m_findAndReplaces = [{find: findTextInput.value,
                          replace: replaceTextInput.value}];
    m_settings.findReplace = JSON.stringify(m_findAndReplaces);
}

// private -----------------------------------------------------------------
function populateFindAndReplace() {
    var json = m_settings.findReplace;
    m_findAndReplaces = JSON.parse(json || '[{"find": "", "replace": ""}]');

    findTextInput.value = m_findAndReplaces[0].find;
    replaceTextInput.value = m_findAndReplaces[0].replace;
}
Previewing Renames
Now we have enough to start renaming files. But first we would like to know what we’ll end up with.
We’ll need a div for it - for now it’ll go below everything so far:
<div>
    <button type="button" name"previewButton" id="previewButton">
        Preview
    </button>
</div>
<div id="previewDiv" style="display: none;" />
And of course we’ll need to hook up the button:
function preview() {
    var pairs = calculateNames();
    populatePreviewDiv(pairs);
}

previewButton.onclick = preview;
Calculate the name of each enabled file and push the old and new name to a list.
function calculateNames() {
    var pairs = [];
    var oldName = "";
    var newName = "";

    m_fileInfos.forEach(function (fileInfo) {
        if (fileInfo.enabled) {
            oldName = fileInfo.fileName;
            newName = calculateName(oldName);
            pairs.push({old: oldName, new: newName});
        }
    });

    return pairs;
}
When calculating each name, we first apply all find and replaces (no regular expressions at this time) then the prefix and postfix. Note that the postfix should go before the extention.
function calculateName(name) {
    var parts;

    m_findAndReplaces.forEach(function (fr) {
        name = name.replace(fr.find, fr.replace);
    });

    name = m_settings.prefix + name;
    if (m_settings.postfix) {
        parts = name.split('.');
        parts.splice(parts.length - 1, 0, m_settings.postfix);
        name = parts.join('.');
    }

    return name;
}
Display all names in a table (crudely):
function populatePreviewDiv(pairs) {
    var html = '<table>';

    pairs.forEach(function (pair)
    {
        html += '<tr><td>';
        html += pair.old;
        html += '</td><td>';
        html += pair.new;
        html += '</td></tr>';
    });

    html += '</table>';

    previewDiv.innerHTML = html;
    previewDiv.style.display = 'block';
}
Rename the Files
Now we can finally rename our files.
We will start with a rename button below the preview div
and have it be invisible initially:
<div id="renameDiv" style="display: none;">
    <button type="button" name="renameButton" id="renameButton">
        Rename
    </button>
</div>
When the preview is shown, we will also have the rename button shown:
var renameDiv = document.querySelector('#renameDiv');
var renameButton = document.querySelector('#renameButton');

...

function preview() {
    ...

    previewDiv.style.display = 'block';
    renameDiv.style.display = 'block';
}

...

renameButton.onclick = executeRename;
To access the new name, we must store it somewhere - in our fileInfo objects:
function createFileInfo(fileEntry) {
    return {'fileEntry': fileEntry,
            'fileName': fileEntry.name,
            'newName': fileEntry.name,
            'fullPath': fileEntry.fullPath,
            'enabled': isFileTypeEnabled(fileEntry.name)};
}
And we must modify our preview code to populate this structure vs. our
temporary one: use m_fileInfos vs. pairs.
Now our executeRename code has access to our file names.
I discovered a few errors:
- The directory entry (not name/path) is needed
- It does not make sense to rename files where old name is new name
With that knowledge, our rename code is fairly simple:
function onRenameFailure(fileError) {
    console.log("ERROR: Could not rename: " +
                (fileError.message || fileError.name));
}

function executeRename() {
    m_fileInfos.forEach(function (fileInfo) {
        if (fileInfo.enabled && fileInfo.fileName != fileInfo.newName) {
            fileInfo.fileEntry.moveTo(m_directoryEntry, fileInfo.newName,
                                      undefined, onRenameFailure);
        }
    })
}
We use the
Entry object’s moveTo
method.
It requires a directory entry, the new name and I give a log on error method.
Version 0.1 is complete
And that is it! We now have a very basic batch file renaming application.

Click here to download the completed source code
There are many tasks to complete to make this a more usable application, but this does the basics and provides a testbed to know what features may be desired.
Mostly critically, I have not tested this application. If I do find major bugs, I’ll come back and update this post and source files.
To do:
- Make source available on github
- UX
- Update preview on options change (automatically)
- Espeically when user checks/unchecks files
- Status or confirmation of rename
- Repopulate (everything) on rename completed
- Update preview on options change (automatically)
- Style sheets
- Checkable prefix and postfix
- So you can remember settings, but not always use it
- Multiple find and replace
- These checkable too ?
- File extension options
- Number/Counting options
- Check all/clear all buttons
- Directory recursion
- If allowed by Chrome
- Publish to chrome webstore
This task list is being addressed in this post. The goal of the updated post is to get the app ready for the Chrome Web Store.
The source and task list will remain here for posterity, but are now located on github:
Downsides of Working on a Chromebook
These are some downsides related to working on a Chromebook in my living room recliner.
- Only one monitor
- Mouse is practially required (and USB would be better than bluetooth)
- Still getting used to no delete key
- No way to use git directly
- I’m not sure I can use github exclusively through their web interface